使用教程
启动一个 Demo 模型训练,需要进行三项准备,安装,数据集准备和模型训练配置。接下来,首先会介绍数据准备相关的操作,再简要描述模型训练配置相关的内容。
安装
请参考安装文档进行安装。
数据准备 (使用huggingface数据集)
如果使用huggingface数据集进行在线加载并且在线tokenize的话,那么以roneneldan/TinyStories这个数据为例,数据准备阶段只需要将配置文件做如下改动:
TRAIN_FOLDER = "roneneldan/TinyStories"
data = dict(
    type="hf",
    tokenizer_path="internlm/internlm-7b",
)
数据准备 (预训练)
InternEvo训练任务的数据集包括一系列的bin和meta文件。使用tokenizer从原始文本文件生成训练用数据集。通过在tools/tokenizer.py中指定模型参数路径的方式来导入tokenizer模型。目前提供V7_sft.model来生成tokens。若想使用不同的模型,可直接修改tokernizer.py中的模型参数路径。
可以运行以下命令生成原始数据对应的bin和meta文件,其中参数text_input_path表示原始文本数据路径,目前支持txt、json和jsonl三种输入格式,bin_output_path表示生成的bin文件的保存路径。
$ python tools/tokenizer.py --text_input_path your_input_text_path --bin_output_path your_output_bin_path
下面是一个数据处理的例子:
给定一个包含原始数据集的文件raw_data.txt,原始数据集如下所示:
感恩生活中的每一个细节,才能真正体会到幸福的滋味。
梦想是人生的动力源泉,努力追逐,才能实现自己的目标。
学会宽容和理解,才能建立真正和谐的人际关系。
可以通过运行以下命令来生成bin和meta文件:
$ python tools/tokenizer.py --text_input_path raw_data.txt --bin_output_path cn/output.bin
需要注意的是,生成的bin文件需要保存在cn或者en或者code或者ja或者ar或者kaoshi这六个目录下,以区分数据集的类型。
其中,cn表示中文数据集;en表示英文数据集;code表示代码数据集;ja表示日语数据集;ar表示阿拉伯语数据集;kaoshi表示考试数据集。
生成的bin文件的格式如下:
{"tokens": [73075, 75302, 69522, 69022, 98899, 67713, 68015, 81269, 74637, 75445, 99157]}
{"tokens": [69469, 60355, 73026, 68524, 60846, 61844, 98899, 67775, 79241, 98899, 67713, 67800, 67453, 67838, 99157]}
{"tokens": [68057, 79017, 60378, 68014, 98899, 67713, 67990, 68015, 70381, 67428, 61003, 67622, 99157]}
bin文件中的每一行均对应原始数据集中的每一个句子,表示每个句子的token(下文将用sequence指定)。
生成的meta文件的格式如下:
(0, 11), (90, 15), (208, 13)
在meta文件中,每个元组对应着bin文件中每一个sequence的元信息。其中,元组的第一个元素表示每个sequence在所有sequence中的starting index,第二个元素表示每个sequence中有多少个tokens。
例如,对于第一个sequence,starting index为 0,有 11 个tokens;对于第二个sequence,由于第一个sequence转换为string后的长度为89,因此它的starting index为 90,有 15 个tokens。
json和jsonl类型的文件的bin和meta文件格式和txt一致,此处不再赘叙。
数据准备 (微调)
微调任务的数据集格式与预训练任务保持一致,生成的数据格式为一系列的bin和meta文件。以下以 Alpaca 数据集为例,介绍微调的数据准备流程。
下载 Alpaca 数据集
对 Alpaca 数据进行 tokenize,使用以下命令
python tools/alpaca_tokenizer.py /path/to/alpaca_dataset /path/to/output_dataset /path/to/tokenizer --split_ratio 0.1
建议用户参考 alpaca_tokenizer.py 编写新的脚本对自己的数据集进行 tokenize
训练配置
以 7B Demo 的配置文件configs/7B_sft.py为例:
JOB_NAME = "7b_train"
DO_ALERT = False

SEQ_LEN = 2048
HIDDEN_SIZE = 4096
NUM_ATTENTION_HEAD = 32
MLP_RATIO = 8 / 3
NUM_LAYER = 32
VOCAB_SIZE = 103168

MODEL_ONLY_FOLDER = "local:llm_ckpts/xxxx"
# Ckpt folder format:
# fs: 'local:/mnt/nfs/XXX'
SAVE_CKPT_FOLDER = "local:llm_ckpts"

# boto3 Ckpt folder format:
# import os
# BOTO3_IP = os.environ["BOTO3_IP"] # boto3 bucket endpoint
# SAVE_CKPT_FOLDER = f"boto3:s3://model_weights.{BOTO3_IP}/internlm"
CHECKPOINT_EVERY = 50
ckpt = dict(
    enable_save_ckpt=False,  # enable ckpt save.
    save_ckpt_folder=SAVE_CKPT_FOLDER,  # Path to save training ckpt.
    # 'load_ckpt_info' setting guide:
    # 1. the 'path' indicate ckpt path,
    # 2. the 'content‘ means what states will be loaded, support: "model", "sampler", "optimizer", "scheduler", "all"
    # 3. the ’ckpt_type‘ means the type of checkpoint to be loaded, support: "internevo", "llama", "hf_llama", "hf_model".
    load_ckpt_info=dict(path=MODEL_ONLY_FOLDER, content=("model",), ckpt_type="internevo"),
    # 'auto_resume' is designed to automatically load the latest checkpoint from 'save_ckpt_folder' when encountering
    # training interruptions/hangs caused by hardware failures, using a scheduling system (such as k8s/slurm)
    # with an automatic restart mechanism upon training reboot.
    # Please be aware that if `auto_resume` is not set (its default value is True), it will not load the checkpoint
    # path specified in `load_ckpt_info` by default.
    # If you want to initialize your model weights from another model, you must set `auto_resume` to False.
    # If you want to train from scratch, please set `auto_resume` to False and 'load_ckpt_info' to None.
    auto_resume=True,
    checkpoint_every=CHECKPOINT_EVERY,
    async_upload=True,  # async ckpt upload. (only work for boto3 ckpt)
    async_upload_tmp_folder="/dev/shm/internlm_tmp_ckpt/",  # path for temporarily files during asynchronous upload.
    oss_snapshot_freq=int(CHECKPOINT_EVERY / 2),  # snapshot ckpt save frequency.
)

TRAIN_FOLDER = None  # "/path/to/dataset"
VALID_FOLDER = None  # "/path/to/dataset"
data = dict(
    seq_len=SEQ_LEN,
    # micro_num means the number of micro_batch contained in one gradient update
    micro_num=4,
    # packed_length = micro_bsz * SEQ_LEN
    micro_bsz=2,
    # defaults to the value of micro_num
    valid_micro_num=4,
    # defaults to 0, means disable evaluate
    valid_every=50,
    pack_sample_into_one=False,
    total_steps=50000,
    skip_batches="",
    # rampup_batch_size (str): A string with three space-separated integers representing the
    #       starting batch size, the increment, and the number of steps between
    #       each increment. For example, "192 24 8" means that the batch size (micro_num)
    #       starts at 192 and increases by 24 every 8 steps. Defaults to None.
    #       (IMPORTANT): The interval step size is 'micro_bsz'.
    rampup_batch_size="",
    # Datasets with less than 50 rows will be discarded
    min_length=50,
    train_folder=TRAIN_FOLDER,
    valid_folder=VALID_FOLDER,
    empty_cache_and_diag_interval=200,
    diag_outlier_ratio=1.1,
    # whether use shared memory to load meta files
    use_shm=False,
    # when use shm, the default shm_path is "/dev/shm/metacache"
    # shm_path="/dev/shm/metacache"
)

grad_scaler = dict(
    fp16=dict(
        # the initial loss scale, defaults to 2**16
        initial_scale=2**16,
        # the minimum loss scale, defaults to None
        min_scale=1,
        # the number of steps to increase loss scale when no overflow occurs
        growth_interval=1000,
    ),
    # the multiplication factor for increasing loss scale, defaults to 2
    growth_factor=2,
    # the multiplication factor for decreasing loss scale, defaults to 0.5
    backoff_factor=0.5,
    # the maximum loss scale, defaults to None
    max_scale=2**24,
    # the number of overflows before decreasing loss scale, defaults to 2
    hysteresis=2,
)

hybrid_zero_optimizer = dict(
    # Enable low_level_optimzer overlap_communication
    overlap_sync_grad=True,
    overlap_sync_param=False,
    # bucket size for nccl communication params
    reduce_bucket_size=512 * 1024 * 1024,
    # grad clipping
    clip_grad_norm=1.0,
    # whether use new optm
    use_split_tensor_optim=False,
    # when use split tensor optm
    # Perform all gather with a set of parameters of all_gather_size
    all_gather_size=512 * 1024 * 1024,
)

loss = dict(
    label_smoothing=0,
)

adam = dict(
    lr=1e-4,
    adam_beta1=0.9,
    adam_beta2=0.95,
    adam_beta2_c=0,
    adam_eps=1e-8,
    weight_decay=0.01,
)

lr_scheduler = dict(
    total_steps=data["total_steps"],
    init_steps=0,  # optimizer_warmup_step
    warmup_ratio=0.01,
    eta_min=1e-5,
    last_epoch=-1,
)

beta2_scheduler = dict(
    init_beta2=adam["adam_beta2"],
    c=adam["adam_beta2_c"],
    cur_iter=-1,
)

use_fp32_norm = False
model = dict(
    checkpoint=False,  # The proportion of layers for activation aheckpointing, the optional value are True/False/[0-1]
    num_attention_heads=NUM_ATTENTION_HEAD,
    embed_split_hidden=True,
    vocab_size=VOCAB_SIZE,
    embed_grad_scale=1,
    parallel_output=True,
    hidden_size=HIDDEN_SIZE,
    num_layers=NUM_LAYER,
    mlp_ratio=MLP_RATIO,
    apply_post_layer_norm=False,
    dtype="torch.bfloat16",  # Support: "torch.float16", "torch.half", "torch.bfloat16", "torch.float32", "torch.tf32"
    norm_type="rmsnorm",
    layer_norm_epsilon=1e-5,
    use_flash_attn=True,
    # Whether the odd and even columns of the query and key in the model are normally interleaved.
    # If it's True, the model's odd and even columns are normally ordered; if it's False,
    # it means that the model has prematurely concatenated all odd columns and even columns in front
    # and back, in order to improve the RoPE's computational efficiency.
    # Example:
    # qk_interleaved = True: q[-1] = [q1,q2,q3,q4,q5,q6,...], k[-1] = [k1,k2,k3,k4,k5,k6,...]
    # qk_interleaved = False: q[-1] = [q1,q3,q5,...,q2,q4,q6,...], k[-1] = [k1,k3,k5,...,k2,k4,k6,...]
    qk_interleaved=False,
    num_chunks=1,  # if num_chunks > 1, interleaved pipeline scheduler is used.
)
"""
zero1 parallel (dict):
    1. size: int
        * if size <= 0, the size of the zero process group is equal to the size of the dp process group,
            so parameters will be divided within the range of dp.
        * if size == 1, zero is not used, and all dp groups retain the full amount of model parameters.
        * if size > 1 and size <= dp world size, the world size of zero is a subset of dp world size.
        For smaller models, it is usually a better choice to split the parameters within nodes with a setting <= 8.
    2. fsdp: bool, enable/disable torch's fully sharded data parallel, defaults to False.
tensor parallel (dict):
    1. size: int, the size of tensor parallel.
    2. mode: str, the tensor parallel mode, should be in ['mtp', 'msp', 'fsp', 'isp'],
        defaults to 'mtp', means the pure megatron tensor parallel without sequence parallel.
        msp: megatron tensor parallel with sequence parallel, sequence parallel size = tensor parallel size.
        fsp: tensor parallel by flash-attn with sequence parallel, sequence parallel size = tensor parallel size.
        isp: customed intern sequence parallel without tensor parallel, can be used with weight parallel.
pipeline parallel (dict):
    1. size: int, the size of pipeline parallel.
    2. interleaved_overlap: bool, enable/disable communication overlap when using interleaved pipeline scheduler,
        defaults to False.
weight parallel (dict):
    1. size: int, the size of weight parallel.
    2. overlap: bool, enable/disable all_gather/reduce_scatter communication overlap, defaults to False.
    3. memory_pool: bool, enable/disable memory pool, defaults to False.
"""
parallel = dict(
    zero1=dict(size=-1),
    tensor=dict(size=1, mode="mtp"),
    pipeline=dict(size=1, interleaved_overlap=True),
    weight=dict(size=1, overlap=True, memory_pool=True),
)

cudnn_deterministic = False
cudnn_benchmark = False

monitor = dict(
    # feishu alert configs
    alert=dict(
        enable_feishu_alert=DO_ALERT,
        feishu_alert_address=None,  # feishu webhook to send alert message
        light_monitor_address=None,  # light_monitor address to send heartbeat
        alert_file_path=f"llm_alter/{JOB_NAME}_alert.log",
    ),
    tensorboard=dict(
        queue_max_length=10,
    ),
)
接下来将详细介绍启动一个模型训练所需要进行的数据、模型、并行和监控等相关的配置。
数据配置
数据相关的关键参数配置及释义如下所示:
TRAIN_FOLDER = "/path/to/dataset"
SEQ_LEN = 2048
data = dict(
seq_len=SEQ_LEN, # 数据样本长度,默认值为 2048
micro_num=1, # micro_num 是指在一次模型参数更新中会处理的 micro_batch 的数目,默认值为 1
micro_bsz=1, # packed_length = micro_bsz * SEQ_LEN,为一次处理的 micro_batch 的数据大小,默认值为 1
total_steps=50000, # 总的所需执行的 step 的数目,默认值为 50000
min_length=50, # 若数据集文件中,数据行数少于50,将会被废弃
train_folder=TRAIN_FOLDER, # 数据集文件路径,默认值为 None;若 train_folder 为空,则以自动生成的随机数据集进行训练测试
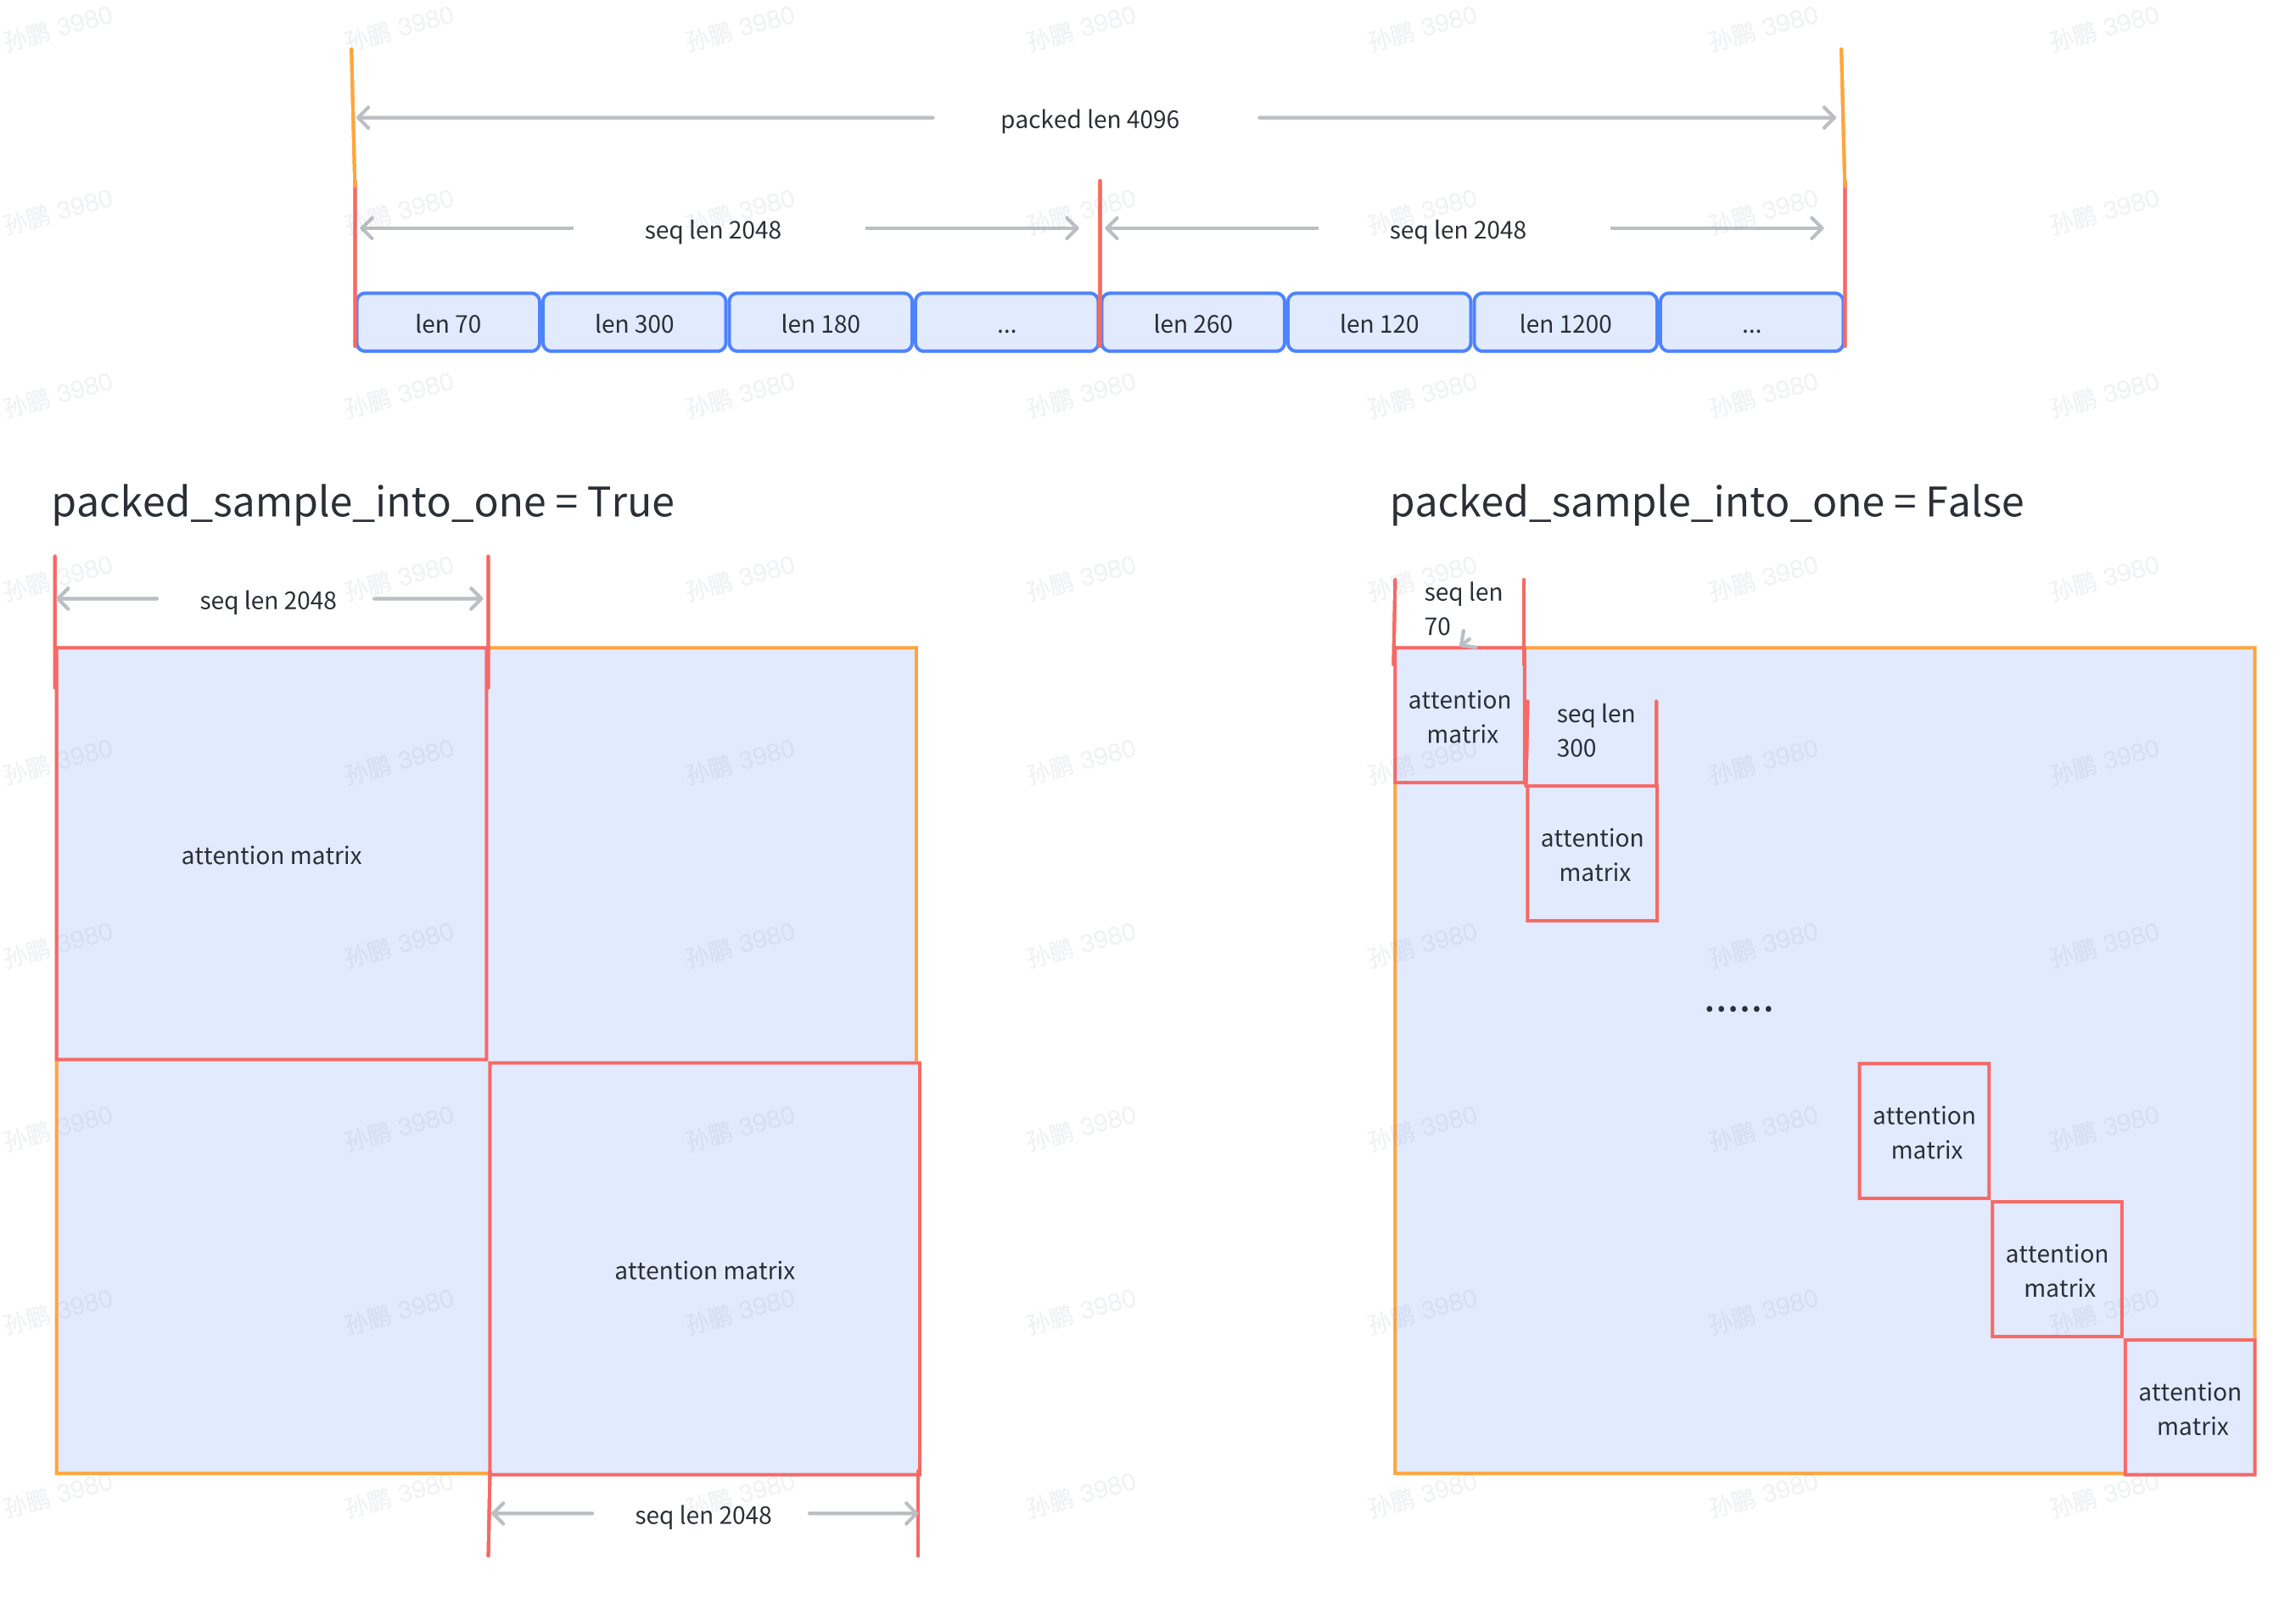
pack_sample_into_one=False, # 数据整理的逻辑,决定是按照 seq_len 维度或者是 sequence 的真实长度来进行attention计算
)
目前支持传入数据集文件路径train_folder,且要求文件格式如下:
- folder
    - code
        train_000.bin
        train_000.bin.meta
数据集的详细内容可参考数据准备模块相关的介绍。
同时,也支持huggingface格式的数据集处理。 train_folder设置为huggingface上可以通过load_dataset直接下载的数据集路径,如:”roneneldan/TinyStories” 在data中,需要新增type及tokenizer_path字段,标示数据集是huggingface格式,并指定tokenizer路径,如:
TRAIN_FOLDER = "roneneldan/TinyStories"
SEQ_LEN = 2048
data = dict(
    type="hf",
    tokenizer_path="internlm/internlm-7b",
    seq_len=SEQ_LEN,  # 数据样本长度,默认值为 2048
    micro_num=1,  # micro_num 是指在一次模型参数更新中会处理的 micro_batch 的数目,默认值为 1
    micro_bsz=1,  # packed_length = micro_bsz * SEQ_LEN,为一次处理的 micro_batch 的数据大小,默认值为 1
    total_steps=50000,  # 总的所需执行的 step 的数目,默认值为 50000
    min_length=50,  # 若数据集文件中,数据行数少于50,将会被废弃
    train_folder=TRAIN_FOLDER,  # 数据集文件路径,默认值为 None;若 train_folder 为空,则以自动生成的随机数据集
进行训练测试
    pack_sample_into_one=False, # 数据整理的逻辑,决定是按照 seq_len 维度或者是 sequence 的真实长度来进行attention计算
)
模型配置
如果在启动训练时要加载模型 checkpoint,可进行如下相关配置:
SAVE_CKPT_FOLDER = "local:/path/to/save/ckpt"
# MODEL_ONLY_FOLDER = "internlm/internlm-7b"
MODEL_ONLY_FOLDER = "local:/path/to/load/resume/ckpt"
ckpt = dict(
    enable_save_ckpt=True,  # 是否开启保存 checkpoint 功能
    save_ckpt_folder=SAVE_CKPT_FOLDER,  # 存储模型和优化器 checkpoint 的路径
    checkpoint_every=float("inf"),  # 每多少个 step 存储一次 checkpoint,默认值为 inf
    # 断点续训时,加载模型和优化器等权重的路径,将从指定的 step 恢复训练
    # content 表示哪些状态会被加载,支持: "model", "sampler", "optimizer", "scheduler", "all"
    # ckpt_type 表示加载的模型类型,目前支持: "internevo", "llama", "hf_llama", "hf_model"
    # 其中,"hf_model"类型表示从huggingface上下载模型加载ckpt,MODEL_ONLY_FOLDER需要设置为可以
    # 通过AutoModel直接加载的模型路径,如:"internlm/internlm-7b"
    load_ckpt_info=dict(path=MODEL_ONLY_FOLDER, content=("model",), ckpt_type="internlm"),
    # 'auto_resume' 旨在在遇到由硬件故障引起的训练中断/挂起时,自动从 'save_ckpt_folder' 加载最新的检查点,
    # 使用调度系统(例如 k8s/slurm)在训练重启时自动重启机制。
    # 请注意,如果未设置 auto_resume(其默认值为 True),它将不会默认加载 load_ckpt_info 中指定的检查点路径。
    # 如果你想从另一个模型初始化你的模型权重,必须将 auto_resume 设置为 False。
    # 如果你想从头开始训练,请将 auto_resume 设置为 False 并将 'load_ckpt_info' 设置为 None。
    auto_resume=False,
    async_upload=True,  # 异步检查点上传。(仅适用于 boto3 检查点)
    async_upload_tmp_folder="/dev/shm/internlm_tmp_ckpt/",  # 异步上传期间临时文件的路径。
    oss_snapshot_freq=int(CHECKPOINT_EVERY / 2),  # 快照检查点保存频率。
)
注意:
路径若以
local:为前缀,则存储在本地文件系统;若以boto3:为前缀,则存储在远程 oss 上;若无前缀,为huggingface上可以直接下载的模型路径。
模型相关关键参数配置如下所示:
model_type = "INTERNLM"  # 模型类型,默认值为 "INTERNLM",对应模型结构初始化接口函数
NUM_ATTENTION_HEAD = 32
VOCAB_SIZE = 103168
HIDDEN_SIZE = 4096
NUM_LAYER = 32
MLP_RATIO = 8 / 3
model = dict(
    checkpoint=False,   # 进行重计算的模型层数比例,可选值为 True/False/[0-1]
    num_attention_heads=NUM_ATTENTION_HEAD,
    embed_split_hidden=True,
    vocab_size=VOCAB_SIZE,
    embed_grad_scale=1,
    parallel_output=True,
    hidden_size=HIDDEN_SIZE,
    num_layers=NUM_LAYER,
    mlp_ratio=MLP_RATIO,
    apply_post_layer_norm=False,
    dtype="torch.bfloat16",
    norm_type="rmsnorm",
    layer_norm_epsilon=1e-5,
)
注意:用户可自定义模型类型名和模型结构,并配置相对应的模型参数。通过internlm/model/registry.py下的model_initializer对象进行模型初始化函数接口注册,在训练主函数train.py中初始化模型时,可通过model_type配置获取指定的模型初始化接口函数。
如果基于 InternLM 7B继续训练,可以参考 ModelZoo 中 OpenXLab 链接下载权重
并行配置
训练并行配置样例如下:
parallel = dict(
    zero1=dict(size=-1),
    tensor=dict(size=1, mode="mtp"),
    pipeline=dict(size=1, interleaved_overlap=True),
    weight=dict(size=1, overlap=True, memory_pool=True),
)
zero1(字典):
size: 整数
当
zero1 <= 0,则 zero1 进程组的大小等于数据并行进程组的大小,因此优化器状态参数将在数据并行范围内分配当
zero1 == 1,则不使用 zero1 ,所有数据并行组保留完整的优化器状态参数当
zero1 > 1且zero1 <= data_parallel_world_size,则 zero1 进程组是数据并行进程组的子集
fsdp: 布尔值,启用/禁用torch的完全分片数据并行,默认为False。
tensor(字典):
size: 整数,张量并行的大小。
mode: 字符串,张量并行模式,应该是 [‘mtp’, ‘msp’, ‘fsp’, ‘isp’] 中的一个,
默认为 ‘mtp’,意味着没有序列并行的纯Megatron张量并行。
msp: 带序列并行的Megatron张量并行,序列并行大小 = 张量并行大小。
fsp: 通过flash-attn带序列并行的张量并行,序列并行大小 = 张量并行大小。
isp: 定制的内部序列并行,不带张量并行,可以与权重并行一起使用。
pipeline(字典):
size: 整数,流水线并行的大小。
interleaved_overlap: 布尔值,启用/禁用在使用交错流水线调度器时的通信重叠,默认为False。
weight(字典):
size: 整数,权重并行的大小。
overlap: 布尔值,启用/禁用all_gather/reduce_scatter通信重叠,默认为False。
memory_pool: 布尔值,启用/禁用内存池,默认为False。
注意:数据并行大小 = 总的 GPU 数目 / 流水线并行大小 / 张量并行大小
启动训练
完成了以上数据集准备和相关训练配置后,可启动 Demo 训练。接下来分别以 slurm 和 torch 环境为例,介绍训练启动方式。
若在 slurm 上启动分布式运行环境,多节点 16 卡的运行命令如下所示:
$ srun -p internllm -N 2 -n 16 --ntasks-per-node=8 --gpus-per-task=1 python train.py --config ./configs/7B_sft.py
若在 torch 上启动分布式运行环境,单节点 8 卡的运行命令如下所示:
$ torchrun --nnodes=1 --nproc_per_node=8 train.py --config ./configs/7B_sft.py --launcher "torch"
运行结果
以 slurm 上单机 8 卡的 Demo 训练配置为例,训练结果日志展示如下:
2023-07-07 12:26:58,293	INFO launch.py:228 in launch -- Distributed environment is initialized, data parallel size: 8, pipeline parallel size: 1, tensor parallel size: 1
2023-07-07 12:26:58,293	INFO parallel_context.py:535 in set_seed -- initialized seed on rank 2, numpy: 1024, python random: 1024, ParallelMode.DATA: 1024, ParallelMode.TENSOR: 1024,the default parallel seed is ParallelMode.DATA.
2023-07-07 12:26:58,295	INFO train.py:378 in main -- ===========New Run Jul07_12-26-58 on host:SH-IDC1-10-140-0-135,tp:0,pp=0,dp=0===========
2023-07-07 12:26:58,296	INFO train.py:378 in main -- ===========New Run Jul07_12-26-58 on host:SH-IDC1-10-140-0-135,tp:0,pp=0,dp=5===========
2023-07-07 12:26:58,296	INFO train.py:378 in main -- ===========New Run Jul07_12-26-58 on host:SH-IDC1-10-140-0-135,tp:0,pp=0,dp=1===========
2023-07-07 12:26:58,296	INFO train.py:378 in main -- ===========New Run Jul07_12-26-58 on host:SH-IDC1-10-140-0-135,tp:0,pp=0,dp=6===========
2023-07-07 12:26:58,296	INFO train.py:378 in main -- ===========New Run Jul07_12-26-58 on host:SH-IDC1-10-140-0-135,tp:0,pp=0,dp=7===========
2023-07-07 12:26:58,296	INFO train.py:378 in main -- ===========New Run Jul07_12-26-58 on host:SH-IDC1-10-140-0-135,tp:0,pp=0,dp=2===========
2023-07-07 12:26:58,296	INFO train.py:378 in main -- ===========New Run Jul07_12-26-58 on host:SH-IDC1-10-140-0-135,tp:0,pp=0,dp=4===========
2023-07-07 12:26:58,296	INFO train.py:378 in main -- ===========New Run Jul07_12-26-58 on host:SH-IDC1-10-140-0-135,tp:0,pp=0,dp=3===========
2023-07-07 12:28:27,826	INFO hybrid_zero_optim.py:295 in _partition_param_list -- Number of elements on ranks: [907415552, 907411456, 910163968, 910163968, 921698304, 921698304, 921698304, 921698304], rank:0
2023-07-07 12:28:57,802	INFO train.py:323 in record_current_batch_training_metrics -- tflops=63.27010355651958,step=0,loss=11.634403228759766,tgs (tokens/gpu/second)=1424.64,lr=4.0000000000000003e-07,loss_scale=65536.0,grad_norm=63.672620777841004,micro_num=4,num_consumed_tokens=131072,inf_nan_skip_batches=0,num_samples_in_batch=19,largest_length=2048,largest_batch=5,smallest_batch=4,adam_beta2=0.95,fwd_bwd_time=6.48
2023-07-07 12:29:01,636	INFO train.py:323 in record_current_batch_training_metrics -- tflops=189.83371103277346,step=1,loss=11.613704681396484,tgs (tokens/gpu/second)=4274.45,lr=6.000000000000001e-07,loss_scale=65536.0,grad_norm=65.150786641452,micro_num=4,num_consumed_tokens=262144,inf_nan_skip_batches=0,num_samples_in_batch=16,largest_length=2048,largest_batch=5,smallest_batch=3,adam_beta2=0.95,fwd_bwd_time=3.67
2023-07-07 12:29:05,451	INFO train.py:323 in record_current_batch_training_metrics -- tflops=190.99928472960033,step=2,loss=11.490386962890625,tgs (tokens/gpu/second)=4300.69,lr=8.000000000000001e-07,loss_scale=65536.0,grad_norm=61.57798028719357,micro_num=4,num_consumed_tokens=393216,inf_nan_skip_batches=0,num_samples_in_batch=14,largest_length=2048,largest_batch=4,smallest_batch=3,adam_beta2=0.95,fwd_bwd_time=3.66
2023-07-07 12:29:09,307	INFO train.py:323 in record_current_batch_training_metrics -- tflops=188.8613541410694,step=3,loss=11.099515914916992,tgs (tokens/gpu/second)=4252.55,lr=1.0000000000000002e-06,loss_scale=65536.0,grad_norm=63.5478796484391,micro_num=4,num_consumed_tokens=524288,inf_nan_skip_batches=0,num_samples_in_batch=16,largest_length=2048,largest_batch=5,smallest_batch=3,adam_beta2=0.95,fwd_bwd_time=3.7
2023-07-07 12:29:13,147	INFO train.py:323 in record_current_batch_training_metrics -- tflops=189.65918563194305,step=4,loss=10.149517059326172,tgs (tokens/gpu/second)=4270.52,lr=1.2000000000000002e-06,loss_scale=65536.0,grad_norm=51.582841631508145,micro_num=4,num_consumed_tokens=655360,inf_nan_skip_batches=0,num_samples_in_batch=19,largest_length=2048,largest_batch=6,smallest_batch=3,adam_beta2=0.95,fwd_bwd_time=3.68
2023-07-07 12:29:16,994	INFO train.py:323 in record_current_batch_training_metrics -- tflops=189.3109313713174,step=5,loss=9.822169303894043,tgs (tokens/gpu/second)=4262.67,lr=1.4000000000000001e-06,loss_scale=65536.0,grad_norm=47.10386835560855,micro_num=4,num_consumed_tokens=786432,inf_nan_skip_batches=0,num_samples_in_batch=17,largest_length=2048,largest_batch=6,smallest_batch=3,adam_beta2=0.95,fwd_bwd_time=3.69
加载训练的checkpoint并生成
若在 slurm 上启动分布式运行环境,多节点 16 卡的运行命令如下所示:
$ srun -p internllm -N 2 -n 16 --ntasks-per-node=8 --gpus-per-task=1 python generate.py --config ./configs/7B_sft.py
在配置文件中添加generation配置
generation = dict(
    ckpt_folder="/path/to/saved/ckpt",
    output_folder="/path/to/save/generation",
    batch_size=1,
    eos_id=[2, 0],
    bos_id=1,
    max_length=100,
    do_sample=True,
    temperature=1.0,
    top_k=50,
    top_p=1.0,
    repetition_penalty=1,
    length_penalty=1.0,
)
长文本生成
在推理阶段,我们可以使用 Dynamic NTK RoPE 来代替原始的 RoPE,从而使得模型能够适应长文本的输入输出,达到 16K 的外推效果。 目前 InternLM 支持在 huggingface 格式和 InternLM 本身格式的模型中使用 Dynamic NTK RoPE。
对于 huggingface 格式的模型,dynamic ntk rope 目前是被默认使用的。如果用户想要关闭该行为,请将
config.json中的rotary.type修改为origin;对于 InternLM 本身格式的模型,在推理时,通过在初始化模型的配置字典中添加
use_dynamic_ntk_rope=True来开启这一行为。
用户可以直接通过 web_demo 来直观地对比查看 Dynamic NTK RoPE 是如何生效的。例如文件长文本示例中存放着一个token长度超过2200的文本,如果不使用 Dynamic NTK, 模型是完全无法回答该文本对应的问题。而使用 Dynamic NTK RoPE 后 InternLM Chat 7B v1.1 模型的回答如下所示:

关于 Dyanmic NTK 的原理,详细请参考